ClearIP TLS enablement
Most ClearIP customers connect their telecom network to ClearIP using TCP. Some may want to use TLS for the additional encryption security it provides.
Here are options for TLS (Transport Layer Security) enablement:
- Our preferred recommendation is that you use the TLS capabilities available in your telecom network equipment and software.
- If your network equipment does not support TLS, we encourage you to consider telecom network solutions from our interop technology partners that do.
- If circumstances do not allow you to obtain a TLS-ready solution at this time, you can use the ClearIP TLS Proxy. This software will enable you to connect a UDP (User Datagram Protocol) or TCP network to ClearIP using TLS.
Network configuration
The ClearIP TLS Proxy receives SIP INVITEs from the switch sent using UDP or TCP and sends them to ClearIP using TLS. The TLS Proxy receives the replies from ClearIP and sends the messages to the appropriate network elements (e.g., switch, SBC).
The following figure shows the call flow for when ClearIP returns a SIP 503 Service Unavailable response:
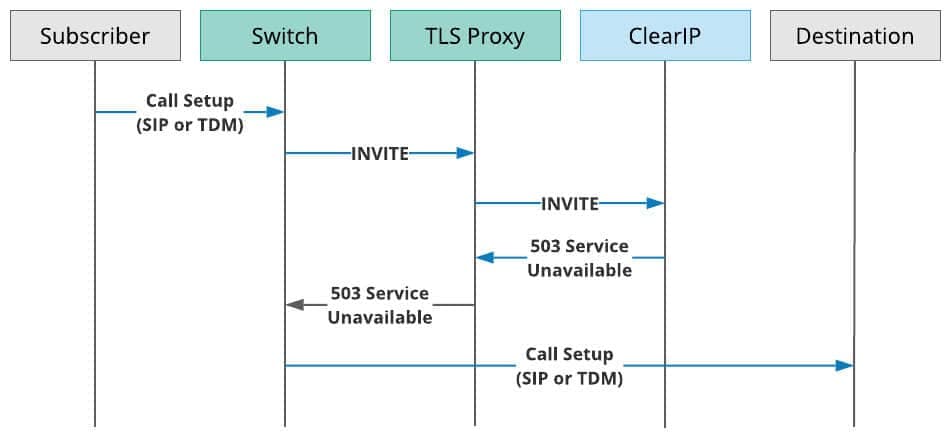
ClearIP TLS Proxy within a telecommunications network
- A Subscriber sends a call to the Switch over SIP or TDM.
- The Switch sends a SIP INVITE to the TLS Proxy.
- The TLS Proxy sends the SIP INVITE to ClearIP for toll fraud prevention and/or robocall mitigation.
- ClearIP responds to the TLS Proxy with a SIP 503 Service Unavailable message.
- The TLS Proxy sends the SIP 503 message to the Switch.
- The Switch route advances and routes the call to the desired Destination using either SIP or TDM.

ClearIP TLS Proxy installation and setup
1. Create Virtual Machines
Create Virtual Machines (VMs) inside your private network with 4 GB of RAM and 2 cores running CentOS 7.x or Redhat 7.x.
- The VMs must have access to the internet.
- The VMs should not have public IP addresses. We recommend that you set up them up with Network Address Translation (NAT) through a firewall.
- No ports should be opened for external access.
- All connections to ClearIP from your network will be initiated through proxies running in the VMs. They will connect to ClearIP using TLS 1.2, so all traffic will be encrypted.
- The proxies will accept SIP messages on all interfaces via UDP (5060), TCP (5060), and TLS 1.2 (5061).
2. Set up a firewall on the server
Only trusted devices should be able to send SIP messages to the proxies. If untrusted devices exist on the same network as the proxies, then you must use a firewall to limit access.
If firewald is not already installed, run these commands:
yum install -y firewalld
reboot
Run these commands to close out ports 5060 and 5061:
firewall-cmd --zone=public --remove-port=5060/udp --permanent
firewall-cmd --zone=public --remove-port=5060/tcp --permanent
firewall-cmd --zone=public --remove-port=5061/tcp --permanent
firewall-cmd --reload
Then, you can allow a specific source IP from your Switch to the TLS Proxy with these commands:
firewall-cmd --permanent --add-rich-rule='rule family="ipv4" source address="x.x.x.x" port protocol="udp" port="5060" accept'
firewall-cmd --reload
These rules only apply to inbound (source) traffic. Outbound traffic is unrestricted by these rules.
If you use a different operating system than CentOS 7, then the commands may be different.
3. Install the TLS Proxy on each VM
To install the proxy on either CentOS 7.x or Redhat 7.x, run this command:
curl https://files.transnexus.com/clearip/proxy/tls/install7.sh | sh -s
To install the proxy on Redhat 8.x or Oracle Linux 8.x UEK, run this command:
curl https://files.transnexus.com/clearip/proxy/tls/install8.sh | sh -s
The proxy starts when installed and whenever its VM is rebooted. There is no starting/stopping or further configuration required.
4. Configure the Switch to route calls to the TLS Proxy
You should configure your switch to route calls directly to the TLS Proxy for test calls that should be monitored by ClearIP. If the TLS Proxy is not available, then the Switch should be configured to route advance the call directly to the Destination as a backup.
We recommend that you do not send outbound calls made to Public Safety Answering Points (PSAPs), for example, 911/933 calls, to ClearIP. If ClearIP configurations are not made carefully to account for emergency calls to PSAPs, then these critical calls could be inadvertently blocked. In your routing translations, you should split off emergency calls first so that emergency calls are not sent to ClearIP, but every other outbound call goes through ClearIP.
5. Add the TLS Proxy as a ClearIP SBC
Add the proxy as an entry in the ClearIP SBCs page to whitelist the IP address in ClearIP.
6. Send a test call to the TLS Proxy
When you send call traffic to ClearIP, the software will use the SIP INVITE and perform the services configured.
If the proxy IP address has not been whitelisted in the ClearIP SBCs page, then ClearIP returns a SIP 403 Forbidden response to the proxy. Once the proxy IP address has been whitelisted, then ClearIP can be configured to return the following response codes:
- If the ClearIP services don’t result in a block or diversion and neither routing nor STIR/SHAKEN services were requested, then ClearIP will return a SIP 503 Service Unavailable message. Your telecom network will then route-advance to the next destination in your routing table and send the call.
- If routing is enabled or a service initiates a diversion, ClearIP will return a SIP 302 Moved Temporarily to redirect the call to specific routes or divert it (e.g., to the CAPTCHA gateway, which prompts for human response).
- If a ClearIP service initiated a block, ClearIP will return a SIP 603 Decline message. The proxy forwards this SIP 603 response to your switch, which will then block the call to prevent a route advance.
7. Send production calls to the TLS Proxy
Once your ClearIP account has been configured with the desired services and integration testing is successful, you can configure your switch to send production calls to the proxy.
Troubleshooting
Configure the Proxy to use TCP instead of TLS
If there are any connectivity issues to ClearIP using the default TLS transport, you can try to switch the transport to TCP and test the connection.
The TLS Proxy can be configured to use either TLS or TCP when communicating with ClearIP. TLS encrypts the messages between the proxy and ClearIP. Switching transport to TCP also allows you to pull unencrypted call traces from the proxy for easier troubleshooting.
To do this, use any text editor as the root user to edit the config file located here:
/etc/opensips/opensips.cfg
The following line should be changed from
$du = "sip:sip.clearip.com:5061;transport=tls";
to
$du = "sip:sip.clearip.com:5060;transport=tcp";
Then run this command to restart the TLS Proxy so the change takes effect:
sudo systemctl restart opensips
Capture a call trace using tcpdump
You can capture a call trace in your network traffic by running the tcpdump command with different parameters. First, you need to install tcpdump using this command:
sudo yum -y install tcpdump
Then you can run tcpdump to view SIP messages on the default SIP port 5060 with messages displayed on the console:
sudo tcpdump -A -s 0 -n -nn -i any port 5060
You can also choose to view all network traffic and save the messages to a pcap file:
sudo tcpdump -w trace.pcap -i any
Contact us today for more information on ClearIP and the ClearIP In-line Proxy.
ClearIP delivers the fastest, easiest, most-precise prevention of toll fraud, robocalls and TDoS attacks. It’s ready-to-go with STIR/SHAKEN.
Learn more about ClearIP